
Introduction to Artisan Pizza Dough
Making your own artisan pizza dough at home is not just an activity; it's an experience that infuses joy into your kitchen. But why should you consider crafting it yourself? For starters, homemade pizza dough allows you to control the ingredients, ensuring that you’re using high-quality, fresh elements that cater to your taste and dietary preferences.
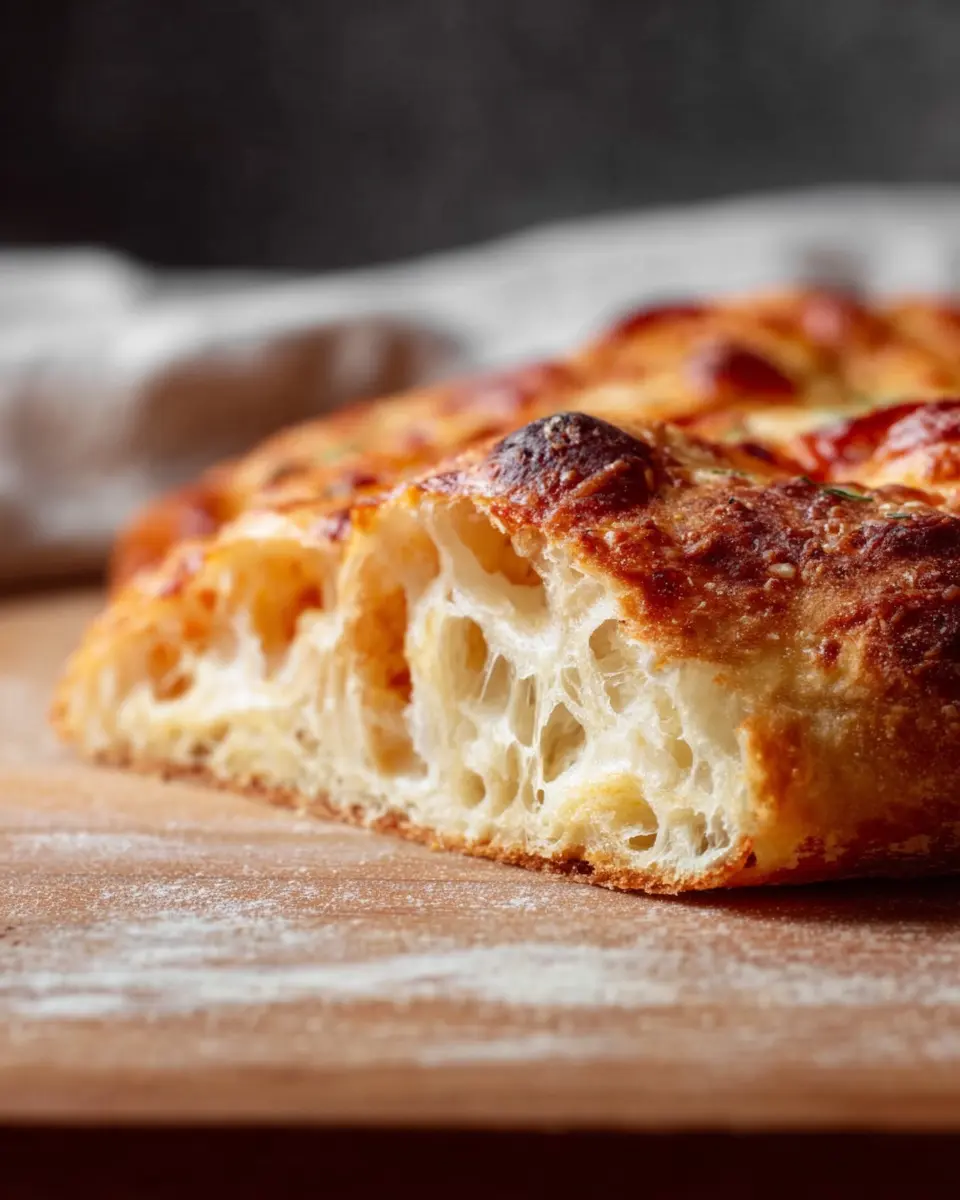
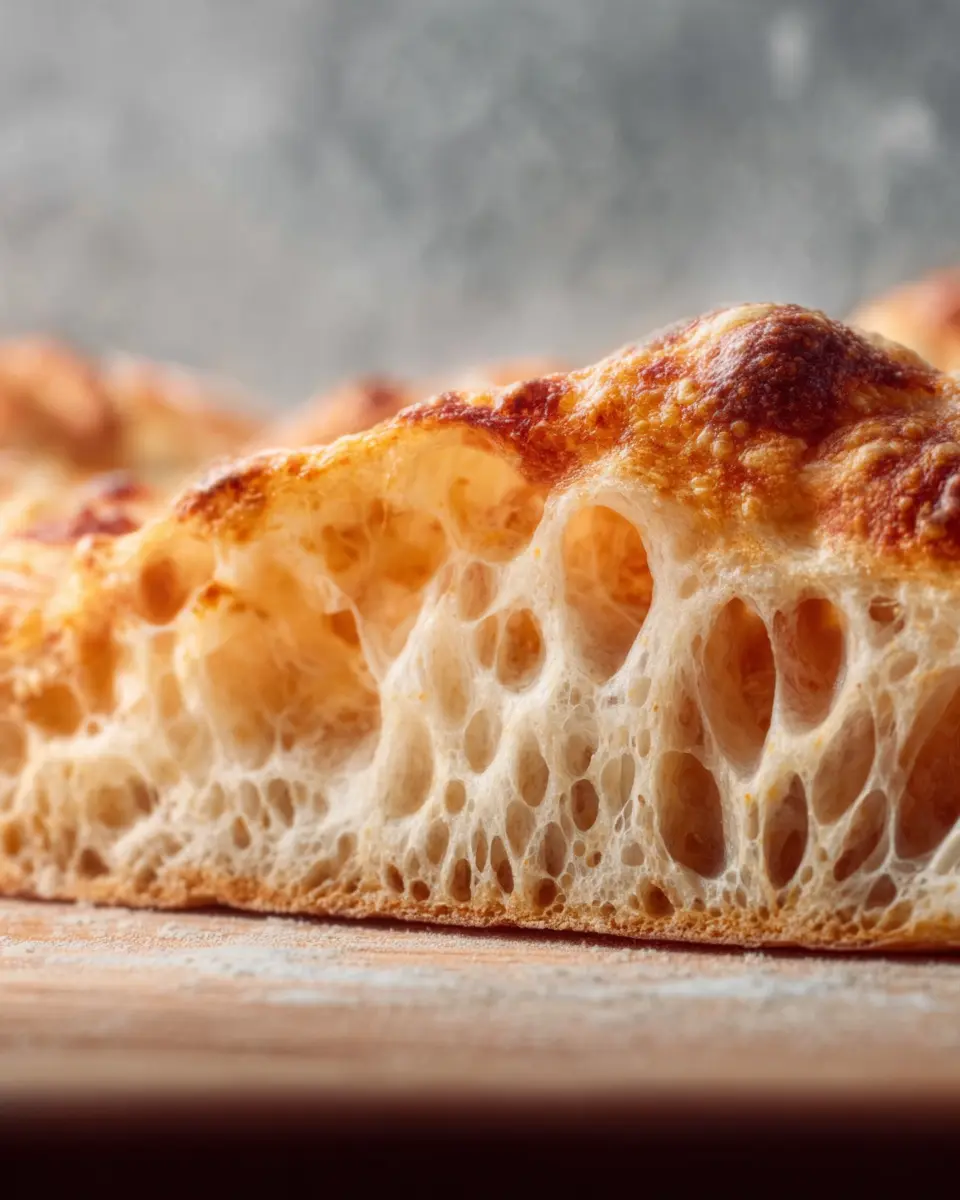
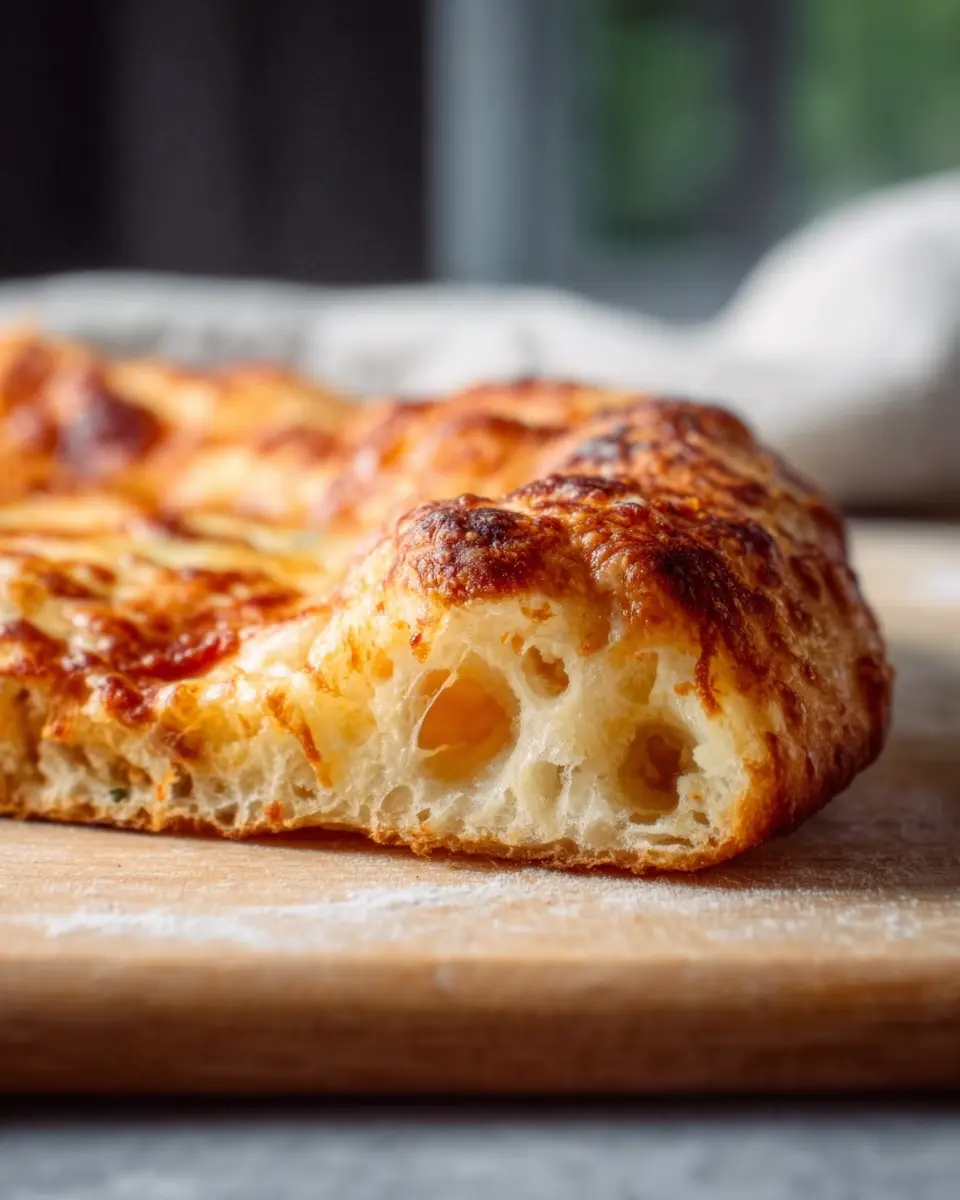
When you understand that most store-bought doughs often contain preservatives and artificial additives, the benefits of rolling up your sleeves and making your own become clear. Plus, there's something inherently satisfying about the process, from mixing the flour to kneading the dough. According to food experts, a high-hydration dough like this one allows for better flavor development through long fermentation. This translates into a crispy, chewy, bubbly crust that you simply can't achieve with pre-packaged options.
Not to mention, diving into baking acts as a great stress reliever and a means of creative expression. Whether experimenting with various toppings or shaping them into fun designs, each pizza becomes an extension of your personality. So gather your ingredients and let's embark on a culinary journey that will elevate your pizza nights!
For further insights on the art of bread-making, consider checking out resources from esteemed sites like King Arthur Baking.
Ingredients for Artisan Pizza Dough
Creating artisan pizza dough at home is not only rewarding but also a delightful experience! Here, we’ll go over the essential ingredients that will set you on the path to achieving that perfect, crispy, chewy, and bubbly crust.
Quality All-Purpose Flour
- 500g (3 ¾ cups plus 2 tbsp) of all-purpose flour serves as the foundation for your dough. Choosing a high-quality flour significantly impacts the final texture and flavor. For a more artisan touch, you might consider using bread flour, which has a higher protein content for even better gluten development.
Hydration Level
- 375g (1 ½ cups plus 2 tbsp) of warm water aids in hydration, which is crucial for achieving that billowy softness in your crust. Warm water helps activate the yeast, ensuring an effective rise.
Yeast and Salt
- 1g (¼ tsp) of active dry yeast will kick off the fermentation process, resulting in a flavorful dough.
- 10g (1 ½ tsp) of fine salt not only enhances flavor but also strengthens gluten structure.
Using the right ingredients is key. Have you ever wondered why some pizzas taste better than others? The answer often lies in the quality and balance of these basic yet essential elements. Ready to experiment with your homemade artisan pizza dough? Dive into the full recipe, and you’ll be enjoying your pizza creations in no time! For more details on the effects of hydration and yeast, check out King Arthur Baking.
Step-by-Step Preparation of Artisan Pizza Dough
Making your own artisan pizza dough may seem daunting, but with a little patience and the right technique, you’ll create a beautiful, chewy crust that rivals your favorite pizzeria. Let's walk through the steps together!
Mixing the Ingredients
Start by gathering your ingredients: 500g of all-purpose flour, 375g of warm water, 1g of active dry yeast, and 10g of fine salt. In a large bowl, combine the flour with all but 1 tablespoon of water. Mix until everything is just combined; don’t worry about achieving a smooth consistency just yet! Cover this mixture and let it rest for 20 minutes. This process, known as autolyse, helps the flour absorb the water and improves the dough’s flavor and texture. Meanwhile, sprinkle the yeast over the remaining warm water to dissolve.
Developing the Dough's Texture
After the dough has rested, add the salt on top. Stir the dissolved yeast mixture and pour it over the dough. Now comes the fun part: folding. Dampen your hand to reduce sticking and reach under the dough, stretching it over the top. Repeat this process until the yeast and salt are fully incorporated, creating a shaggy dough. Cover the bowl again and let it rest for about an hour to allow the flavors to meld.
For more detailed insights, check out resources from Serious Eats on dough techniques.
The Gluten Stretching Technique
Next, it's time to develop the gluten in your artisan pizza dough. Wet your hand again and stretch a bit of dough from the bottom, folding it over the center. Rotate the bowl and continue folding until you feel the dough tighten into a ball. Once that's done, lightly grease another bowl and invert the dough into it, seam side down. Cover it and let it rise until it doubles in size—this could take 5 to 6 hours depending on the room temperature.
Shaping the Dough Balls
When your dough is ready, turn it out onto a floured work surface and cut it in half to make two balls. Take one piece and stretch it slightly; then fold each edge toward the center. This action creates tension that will help your dough develop a nice structure. Once shaped, flip it so the seam is on the bottom, and gently manipulate it against the counter until it forms a nice, tight ball. Repeat this with the second piece of dough.
The Final Rise and Readiness
Transfer your dough balls to a greased plate. Lightly oil the tops, cover them, and allow them to rest for another hour at room temperature. During this waiting period, preheat your oven to 500°F (or as high as it will go). If you’re not planning to use the dough immediately, wrap it tightly in plastic wrap and refrigerate it for later use—your dough can last up to 2 days in the fridge!
With these steps, you'll have your very own artisan pizza dough ready for toppings and baking, ensuring that crispy, chewy, bubbly crust you crave. Happy baking!
Variations on Artisan Pizza Dough
Whole Wheat Artisan Pizza Dough
For a heartier option, try substituting half of the all-purpose flour with whole wheat flour. This variation adds a delightful nuttiness and enhances the fiber content, making your pizza a bit more nutritious. Just be mindful that you may need a touch more water to achieve the right consistency, as whole wheat flour absorbs moisture differently.
Gluten-Free Artisan Pizza Dough
If you're looking for a gluten-free option, consider using a blend of gluten-free all-purpose flour and a bit of xanthan gum. This artisan pizza dough alternative typically recreates that crispy, chewy texture you're after. Look for flour blends that include ingredients like brown rice flour, sorghum flour, and tapioca starch for the best results. Just like the traditional recipe, allow for ample resting time to develop those delightful bubbles in the crust.
For more on baking with gluten-free flour, check out Gluten-Free on a Shoestring.
Cooking Tips and Notes for Artisan Pizza Dough
Tools and Equipment Recommendations
To create the perfect artisan pizza dough, having the right tools makes all the difference. Invest in a sturdy mixing bowl, a bench scraper for handling the dough, and a good pizza peel or cast iron pan. A digital kitchen scale is essential for accurate measurements, ensuring your dough turns out just right every time. For baking, a pizza stone or steel is recommended for achieving that coveted crispy crust.
Best Practices for Dough Handling
When working with artisan pizza dough, remember that hydration is key. Keep your hands lightly wet to prevent sticking while shaping. Avoid over-kneading, as a gentle touch helps maintain that lovely airy texture. After shaping, allow the dough to rest, developing its flavor and elasticity. For more expert insights on dough handling, check out this comprehensive guide on pizza dough. By following these tips, you'll enjoy a delicious, bubbly crust that impresses every time!
Serving Suggestions for Artisan Pizza
Classic Margherita
A Classic Margherita pizza is a timeless choice, letting the flavor of your artisan pizza dough shine through. Spread a simple tomato sauce, then layer on fresh mozzarella and basil leaves. Drizzle with high-quality olive oil before popping it in the oven for a delicious, straightforward option.
Creative Topping Ideas
Feeling adventurous? Try topping your pizza with:
- Buffalo chicken drizzled with creamy ranch
- Turkey bacon and caramelized onions
- Artichokes with a sprinkle of feta
- A blend of roasted vegetables for a hearty, vegetarian option
Experiment with flavors to find your perfect combination! Always remember to balance heavier toppings with lighter ones for the best results. For more inspiration, check out Serious Eats and explore their pizza topping guides.
Time Breakdown for Artisan Pizza Dough
Preparation Time
Getting started on your artisan pizza dough takes just about 20 minutes. This involves mixing the ingredients and letting them rest, setting you up for a flavorful base.
Rising Time
Patience is key! The dough requires about 5-6 hours to rise until it doubles in size. This long fermentation process enhances the flavor and texture, creating that signature chewy crust we all love.
Total Time
In total, you're looking at around 8 hours from start to finish. While this may seem lengthy, much of it is hands-off time, allowing you to focus on other tasks or simply daydream about your delicious pizza creations.
Nutritional Facts for Artisan Pizza Dough
When diving into the world of artisan pizza dough, it's good to know what you're eating. Each serving (¼ of a 12-inch pizza) provides roughly:
- Calories: 228
- Key Nutritional Components: Low in fat and cholesterol, this dough features 48g of carbohydrates, 1.7g of fiber, and 6.5g of protein, making it a solid choice for a delicious meal.
Enjoy your pizza with confidence, knowing that it can be part of a balanced diet! For more on the nutritional benefits of homemade pizza, check out sources like Healthline and Nutrition.gov.
FAQs about Artisan Pizza Dough
Can I store artisan pizza dough for later use?
Absolutely! You can refrigerate your artisan pizza dough for up to two days. Just make sure to wrap it tightly in plastic wrap to keep it from drying out. When you're ready to use it, let it come to room temperature before shaping your pizza, which will help it rise and remain fluffy.
What's the secret to a crispy crust?
The secret lies in high hydration and a hot oven! Ensure that your oven is preheated to 500°F (or as high as it will go), and utilize a pizza steel or stone for optimal heat retention. This intense heat will create a beautiful, crispy bottom. Also, let the dough fully rise, as this will enhance that delightful chewiness we all love.
How to adapt the recipe for different climates?
In humid conditions, you might find your artisan pizza dough too sticky. If so, add a touch more flour during mixing. Conversely, in drier climates, you may need to increase the water a bit. Always make adjustments based on how the dough feels; it should be slightly tacky but manageable. For further guidance on dough consistency, check out resources like King Arthur Baking.
Conclusion on Artisan Pizza Dough
Perfecting your artisan pizza dough is a rewarding experience that elevates your homemade pizzas to a whole new level. With just a few simple ingredients and some patience for fermentation, you'll achieve that ideal combination of crispy, chewy, and bubbly crust. Enjoy experimenting with flavors and toppings—your pizza night will never be the same!

artisan pizza dough- crispy, chewy, bubbly crust
Equipment
- large bowl
- pizza peel
- oven
- cast iron pan
- pizza stone
Ingredients
Dough Ingredients
- 500 g all-purpose flour
- 375 g warm water divided
- 1 g active dry yeast
- 10 g fine salt
Instructions
Dough Preparation
- Mix flour and all but 1 tablespoon of the water in a large bowl until just combined, then cover and set aside for 20 minutes to rest. Sprinkle yeast over remaining warm water and set aside to dissolve.
- Sprinkle salt over the surface of the dough. Stir yeast mixture and pour over dough. Fold the dough until it forms a shaggy mixture. Cover and let rest about an hour.
- Fold the dough to develop gluten by stretching and folding it over itself. Let rise until doubled in volume, about 5-6 hours.
- Turn the dough out onto a floured surface, cut in half, and shape each piece into a ball. Let them rest for about an hour.
Pizza Assembly
- Preheat your oven to 500°F, and prepare your pizza steel or stone.
- Flatten one dough ball into a disk and shape into a 12-inch circle. Place it on a floured pizza peel.
- Add sauce and toppings, leave a 1-inch perimeter, and bake for 5 minutes. Broil for 2-4 minutes until the crust is golden.
- For cast iron pan, bake for 15-20 minutes and broil during the last few minutes.


Leave a Reply