
Introduction to Loaded Tater Tot Cups
What are Loaded Tater Tot Cups?
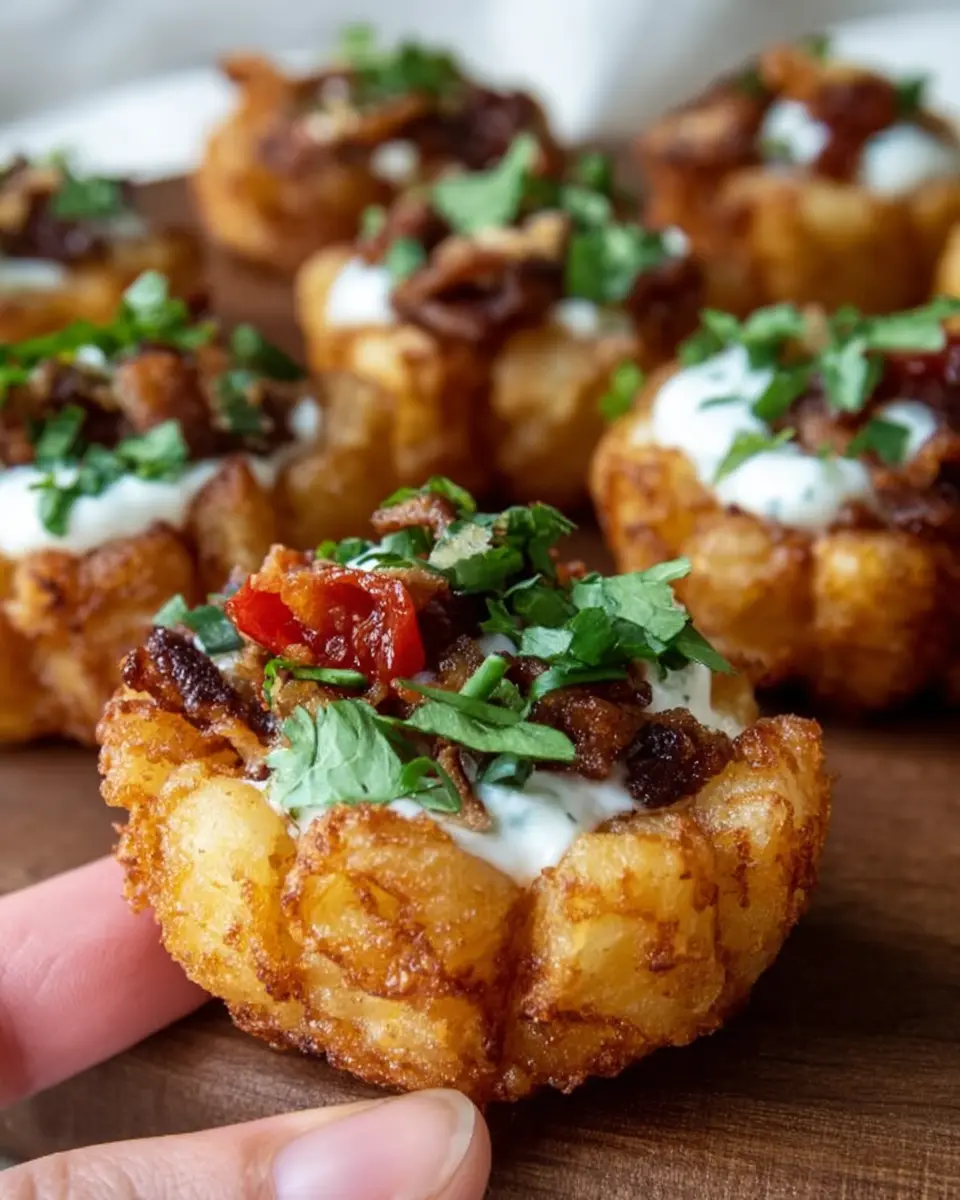
Loaded tater tot cups are a delightful twist on your traditional tater tots, transforming them into bite-sized masterpieces that pack in the flavor! Imagine crispy tater tots pressed into muffin tins, forming little cups that are then overflowed with melty cheese and savory turkey bacon. It’s the perfect combination of crunchy and creamy, making them a favorite at any gathering. Pair these with your choice of ranch dressing or sour cream, and you have an irresistible snack that everyone loves. If you’re looking to impress your guests or treat yourself to a fun meal, these tater tot cups are the way to go.
Why Are They Perfect for Young Professionals?
For young professionals balancing busy work schedules and social lives, loaded tater tot cups fit seamlessly into the routine. They’re quick to prepare, taking just around 30 minutes from start to finish, making them an excellent option for a weeknight snack or a last-minute gathering dish. These cups are not only easy to make but also allow for customization, whether you want to add extra veggies or switch out toppings based on your preferences. Plus, they are great for meal prepping; you can whip up a double batch, freeze them, and pop them in the oven when hunger strikes—minimal effort required! For tips on meal prepping, check out this helpful guide on meal prep strategies.

Ingredients for Loaded Tater Tot Cups
Ready to dive into some delicious loaded tater tot cups? Whether you’re whipping these up for game day or a cozy movie night, you’ll want to gather these essential ingredients to get started.
Essential Ingredients List
- 48 frozen tater tots: This is the base of your cups; ideally, you'll need about four tater tots per muffin tin cavity.
- 1 ¼ cups shredded cheddar cheese: For that rich, cheesy goodness that melts perfectly.
- ¾ cup cooked, crumbled turkey bacon: About six strips should do the trick to add that savory flavor.
- Sour cream or ranch dressing: This will be your creamy topping for a perfect finish.
- Chopped parsley or chives: A little greenery enhances presentation and adds freshness.
Optional Toppings and Variations
Want to switch things up? Here are some fun ideas! Try adding chicken ham or even some sautéed veggies for extra flavor and texture. You can also experiment with spices like paprika or chili powder for a kick. The beauty of loaded tater tot cups is that you can easily personalize them to suit your taste!
For more inspiration, check out these creative tater tot recipes.
Preparing Loaded Tater Tot Cups
Creating these loaded tater tot cups is not only straightforward but also a whole lot of fun! Follow these simple steps to whip up a crowd-pleasing appetizer that’s sure to be a hit at any gathering.
Gather Your Equipment
Before diving into the cooking process, make sure you have everything you need. Here’s what you’ll require:
- Baking sheet pan: For catching any drips during baking.
- Cheese grater: To get that perfect shredded cheese; you can also opt for pre-shredded if you're in a pinch.
- 12-cup muffin tin: This is essential for forming your tater tot cups.
- Shot glass: Surprising, right? But this will help shape those tater tots into the perfect cups!
Preheat the Oven and Prep the Muffin Tin
A proper start is crucial. Go ahead and preheat your oven to 425 degrees F. While that's heating up, take a moment to prep your muffin tin. Greasing it with a cooking spray, olive oil, or melted butter will ensure that your loaded tater tot cups come out easily and retain their shape.
Layer Tater Tots in the Muffin Tin
Now for the fun part! Take your 48 frozen tater tots and place four of them into each muffin tin cavity. They should snugly fit together, forming the base of your cups. This is where the crispy magic begins!
Bake Tater Tots to Create Cups
Pop the muffin tin into your preheated oven and let those tater tots bake for around 10 minutes. This initial bake will start to crisp them up and allow them to form a solid base. Keep an eye on them—you want them golden but not overly crispy just yet!
Add Cheese and Turkey Bacon, Then Bake Again
Once your tater tots have baked, it’s time to give them some love. Use that shot glass to press down the tots in each muffin cup gently. Next, it’s time for toppings! Sprinkle generously with 1 ¼ cups of shredded cheddar cheese and ¾ cup of crumbled turkey bacon (about six strips). After that, pop them back into the oven to bake for another 15-20 minutes until the cheese is melted and bubbly.
Finish with Toppings and Serve
Once your loaded tater tot cups are golden and aromatic, they’re almost there! Remove them from the oven and finish with your choice of sour cream, ranch dressing, and a sprinkle of parsley or chives. This last touch adds flavor and makes them visually appealing. Now, serve them hot and watch them disappear in no time!
Enjoy making your loaded tater tot cups, and don't forget to share your creations! If you’re looking for more kitchen inspiration, check out resources like America's Test Kitchen for additional tips and tricks.
Variations on Loaded Tater Tot Cups
Loaded tater tot cups can easily be tailored to fit various dietary preferences and flavor preferences. Here are three delicious variations to consider for your next gathering!
Vegetarian Loaded Tater Tot Cups
For a meat-free option, simply skip the turkey bacon and load your cups with sautéed vegetables like bell peppers, mushrooms, and spinach. You can add black beans for protein and garnish with fresh avocado or a dollop of guacamole. This way, you’ll satisfy everyone’s cravings without losing any flavor!
Spicy Loaded Tater Tot Cups
If you love a kick of heat, spice up your loaded tater tot cups by adding jalapeños or a touch of hot sauce. You can also use pepper jack cheese instead of cheddar for an extra zing. Consider serving with a side of zesty chipotle dipping sauce to elevate those flavors!
Gourmet Versions with Unique Toppings
Take your loaded tater tot cups to the next level by experimenting with gourmet toppings. Think crab meat, creamy herb-infused cheeses, or caramelized onions. You could even drizzle balsamic reduction over them for a sweet-tangy twist. The possibilities are endless, making these cups a truly customizable treat!
Cooking Tips and Notes for Loaded Tater Tot Cups
How to Ensure the Perfect Crispy Texture
To achieve that coveted crispy texture in your loaded tater tot cups, start by preheating your oven to 425°F. This high heat allows the tots to crisp up nicely. Using a shot glass to create the cup shape not only makes them neat but also ensures even baking. For an extra crunch, consider giving the tots a quick spray of cooking oil before baking. This little tip can make a big difference in texture!
Tips for Making Tater Tot Cups Ahead of Time
Want to prepare your loaded tater tot cups in advance? You’re in luck! You can assemble the tater tot cups and freeze them before baking. Simply prepare them as directed up to the second baking step, then wrap tightly in plastic wrap and store in the freezer. When you’re ready to serve, you can bake them directly from frozen—just increase the baking time by a few minutes. This makes them a fantastic option for busy weeknights or last-minute gatherings.

Serving Suggestions for Loaded Tater Tot Cups
Best dips and sides to complement the dish
When serving your loaded tater tot cups, consider pairing them with a variety of dips to elevate the experience. Classic options like sour cream and ranch dressing are always crowd-pleasers. For a twist, try a spicy jalapeño ranch or BBQ sauce for those who crave a bit more kick. If you're looking for a refreshing side, a light coleslaw can balance out the richness of the tater tots—plus, it adds a nice crunch!
How to present them for gatherings or parties
For gatherings, presentation is key! Serve your loaded tater tot cups on a decorative platter, garnished with fresh herbs like parsley or chives for that vibrant touch. You could also create a fun “tot bar,” allowing guests to customize their own cups with different toppings and dips. Providing small serving spoons can enhance the interactive element, making them a hit at any party. Don't forget to have napkins handy; things can get a little messy, and that's all part of the fun!
For more ideas on party snacks, check out Food Network’s guide.
Time Breakdown for Loaded Tater Tot Cups
Preparation Time
Get started with 30 minutes of preparation for these delicious loaded tater tot cups. This includes gathering your ingredients and getting everything ready for baking.
Cooking Time
Baking these tasty treats takes about 25-30 minutes. You'll first bake the tater tots, shape them, and then let them get crispy with cheese and turkey bacon.
Total Time
In just under an hour, you can have a fantastic appetizer or snack ready to share. Perfect for gatherings, these loaded tater tot cups will definitely be a hit! For more appetizer inspirations, check out this guide on easy party snacks to make your gatherings memorable.
Nutritional Facts for Loaded Tater Tot Cups
Calories per serving
Each of these delightful loaded tater tot cups packs about 180 calories. Perfect for satisfying your cravings without going overboard!
Protein content
You can expect around 6 grams of protein per serving, thanks to the turkey bacon and cheese. This protein boost makes them a great snack option to keep you energized.
Sodium levels
Keep in mind that these tasty bites contain approximately 400 mg of sodium each. Staying mindful of salt intake is always a good idea, especially if you're enjoying these cups at a party!
For more insights into managing sodium intake and other nutritional tips, check out the American Heart Association.
FAQs about Loaded Tater Tot Cups
Can I make these cups in advance?
Absolutely! You can prep your loaded tater tot cups a day ahead. Assemble the cups but don’t bake them. Just cover them tightly and store them in the refrigerator. When you’re ready to enjoy, pop them in the oven directly from the fridge—just add an extra few minutes to the baking time.
What can I use if I don't have a muffin tin?
No muffin tin? No problem! You can use a baking dish by layering the tater tots flat and pressing them down to form a crust. Alternatively, try using silicone molds—they're great for achieving that cup shape. Just keep an eye on the cooking time to ensure everything is crispy and fully cooked.
How can I make these healthier?
To lighten up your loaded tater tot cups, consider these tips:
- Swap out standard tater tots for sweet potato or cauliflower tots.
- Use low-fat cheese or reduce the cheese quantity.
- Substitute turkey bacon for traditional bacon to cut down on fat.
- Pile on the veggies like spinach or peppers for added nutrients!
With these modifications, you can enjoy your favorite snack while keeping things nutrition-friendly! For more health-conscious recipes, check out Healthline for guidelines on eating healthier without sacrificing flavor.
Conclusion on Loaded Tater Tot Cups
In conclusion, loaded tater tot cups are a delightful treat that everyone will love. Perfect for gatherings or a cozy night in, they’re easy to prepare and incredibly satisfying. Feel free to get creative with toppings! Enjoy making memories as you share these crunchy, cheesy bites with friends and family. For more appetizer ideas, check out this tasty appetizer guide that complements your delicious treat perfectly!

Loaded Tater Tot Cups
Equipment
- baking sheet pan
- Cheese Grater
- 12-cup muffin tin
- shot glass
Ingredients
Frozen Tater Tots
- 48 pieces frozen tater tots 4 per muffin tin cavity
- 1 ¼ cups shredded cheddar cheese
- ¾ cup cooked, crumbled bacon about 6 strips
- sour cream, ranch dressing, parsley or chives for topping
Instructions
Cooking Instructions
- Preheat your oven to 425 degrees F, then grease a muffin tin with cooking spray, olive oil, or melted butter.
- Add 4 frozen tater tots into each muffin tin cavity, then bake for 10 minutes.
- Once baked, use a shot glass to press the tater tots into cup shapes. Sprinkle on shredded cheese and crumbled bacon, then bake for another 15-20 minutes.
- Top with your choice of sour cream or ranch dressing, then garnish with parsley or chives before serving!
- *If using fresh bacon, I recommend using the oven method of baking at 425 degrees for 25 minutes and about 15 minutes if using thin bacon. Then transfer the crispy bacon to paper towels to drain off excess grease and chop it up to make bacon crumbles.


Leave a Reply